Some products mentioned were provided for review. Opinions are my own.
I have tried many a stamping plate from Born Pretty Store but I have never tried a stamping nail polish from the company! I was very interested when I saw the new versions so I immediately added one to my list for review.
It’s a little thin for a stamping polish so it’s a bit sheer on darker nail polish (not pictured) however, on light colors it looks very nice. I haven’t tried darker shades but this specific yellow is easy to clean up and does not stain my cuticles or nail beds.
Scroll down to see the look I came up with! I say it’s floral but it reminds me more of a 70’s wallpaper…
Some products were sent for my review. All opinions are my own.
If you’ve been around for a while you know I love a good sugar-spin nail art. Using this technique is fun, rewarding and relaxing….And, a major pain in the ass. I spend hours waiting for the polish to thicken, getting the consistency right, pulling it across perfectly, cleaning up around the cuticles and then waiting for the entire thing to dry. It’s a process but one that I love (for whatever reason).
Lately, I’ve seen “spider gel” on Instagram and a lot of people taking on the art of the sugar-spin. Spider gel is supposed to make sugar-spin hassle-free by taking out the guesswork of it all. I can just dunk a toothpick in the bottle, pull the polish over my nails and voila. A home-made sugar-spun manicure in half the time. Now everyone can have that cool abstract design!
I was thrilled to try the spider gel, from Born Pretty Store, because maybe it would make my favorite technique easier. No. Spider gel sucks and here’s why.
Here are the pros first. The product is easy to handle. It picks up and moves easily. It’s a good consistency for sugar-spin which means there is no wait time to start.
Here’s why I hate (edit: strongly dislike) it. First, it’s hard to get a nice thick line. While it is easy to handle and maneuver I don’t like the stringy nature of the product. Yes, I prefer thick lines but these ensure there is an even amount of polish from one end of the nail to the other. I struggled with this and it was very frustrating.
Second, it’s sticky and a little messier. It smears easily, gets everywhere and stains! It is also very difficult to clean.
Third, it never dries! I don’t wear topcoat over sugar-spin designs because a) it destroys the design and b) I like the 3D effect. I got quite a bit of the gel on the outside of the container and legitimately (I do not exaggerate) the next day it was still sticky. What?
Thinking about it a bit more…is spider gel actually gel? Am I not having good luck with it because I treated it like regular nail polish? Let me know if you’ve tried it and your thoughts in the comments!
Scroll down to see my design and a YouTube tutorial on how I make sugar-spins!
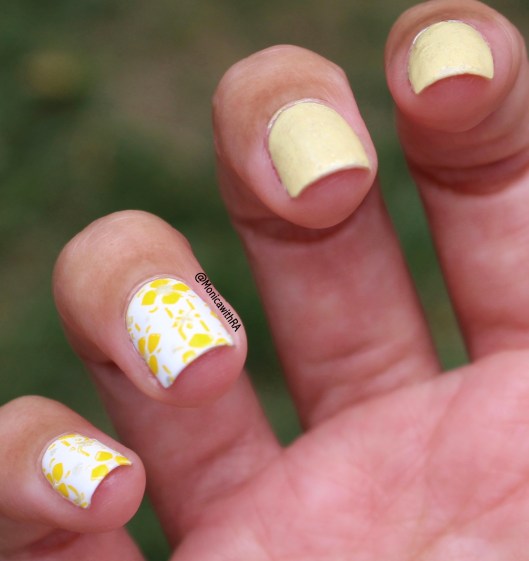
I’ve often said water decals are the easiet way to get fun, cute nail art without the work. This sentiment goes for anyone really but especially those of us with Rheumatoid Arthritis. We just don’t have the pain tolerance or downright dexterity to create tiny masterpieces on our nails (not that I have the patience to that to begin with).
I get most of my water decals from Born Pretty Store because they are cheap and good quality. These floral numbers were more delicate than usual but I’m not sure if that was the design or decal, itself.
The colors are pastel and subtle (aka the watercolor effect) so I think the flowers would look best against a white or off-white base.
I added mine on top of a smooshy yellow base and they are kind of hard to see. Cool kind of effect, though, so I hope you enjoy them!
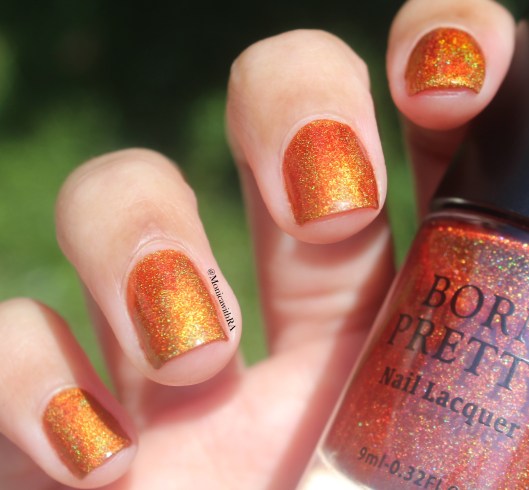
The holographic train doesn’t seem to be slowing down any time soon and I am personally quite okay with that! Born Pretty Store recently came out with some new holographic nail polishes and I couldn’t help asking for one. In this line, there are six new shades ranging from purple and red to grey and green. I went for the orange “Pumpkin Carriage” since it’s my favorite color!
The color builds up quite nicely in two/three coats (depending on the layer’s thickness). And wears well with and without top coat. In the following photos you might notice something a little odd which I will get to after I’ve shown them to you. As I’ve stated in previous reviews, my biggest grievance with BPS polishes is their brush. They are thick and clunky and promote pooling in the cuticles. Sure, the polish cleans up pretty well but with a nicer brush clean up could be completely avoided!
With top coat.
Notice anything unusual??
Not yet?
Wait for it…
What is happening?? First, top coat dulls the holo and makes it look more like orange shimmer. Second, it shows a massive uneven finish in color! Why are parts of it super dark? I did even coats on each nail. It is an odd reaction that is extremely noticeable in any light.
Without top coat.
Clearly there is a difference when it comes to top coat application and unfortunately, it’s an issue that plagues most holographic polishes. The addition of top coat always diminish the rainbows! The orange is not as bright so I guess I have to decide. Do I want brighter orange or brighter holo?
I recommend using the polish without top coat. The holographic particles are more noticeable and the polish lasts just as long, if not longer than with the sealant. It’s a little gritty but honestly, not all that noticeable.
If you’re interested, check out this polish (here)*. And don’t forget to use my 10% off code if you place an order.
Some products provided for review. Opinions remain my own.
I kind of went overboard with this festive nail lok but I kind of love how it turned out. I just wish my camera picked up the colors a bit better. I had to add contrast while editing the photo because I couldn’t see the snowflakes too well.
I thought it was was fitting to use a holiday stamper for this look so I used my new Born Pretty Store dark festive stamper. I was totally drawn to this one because of the dark blue and gold scheme and loved the shimmery navy stamper head. Though, I have to admit I am no longer used to opaque squishy stampers. I prefer my clear one since I can see exactly where I place the image on my nail. This being said, this new one picked up the images nicely and transferred them well to the nail surface but I think I will reserve it for marbling and reverse stamping.
I hope you like this look as much as I do! I don’t usually do multiple stampings since I think one layer looks elegant enough but I just felt like more was more is more in this case!
I have another Rant or Rave video over on my YouTube channel! The Estee Lauder Advanced Night Repair Serum gets an A++ in my books and remains my number #1 holy grail skincare product.
I know the Advanced Night Repair serum keeps my skin young, healthy and texture free because I see how my skin gets when I don’t use it. My face and neck absolutely adore this product and lap it up like none other. If I didn’t use this amazing nightly serum I honestly would look as ill as I feel. This Estee Lauder product is everything I could ask for and more. Did I pique your interest? Make sure you watch the video and subscribe to my channel!

 Born Pretty Store Harunouta stamping plate L081 ($3.59 here)

 Born Pretty Store Stamping Nail Polish in AC03 ($3.59
  Born Pretty Store Spider Gel in UR-08 ($2.99


 Notice anything unusual??
 Not yet?
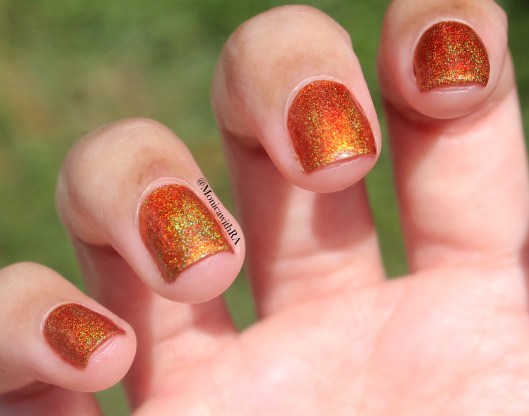
 Wait for it…
 What is happening?? First, top coat dulls the holo and makes it look more like orange shimmer. Second, it shows a massive uneven finish in color! Why are parts of it super dark? I did even coats on each nail. It is an odd reaction that is extremely noticeable in any light.
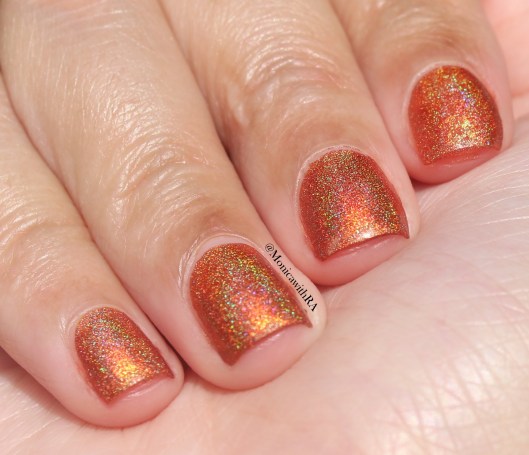 Clearly there is a difference when it comes to top coat application and unfortunately, it’s an issue that plagues most holographic polishes. The addition of top coat always diminish the rainbows! The orange is not as bright so I guess I have to decide. Do I want brighter orange or brighter holo?


