Born Pretty Store Review: Mixed Metals Foil Transfer Stickers

Tags

, , , , , , ,

Provided for review. All opinions are my own.

I have another (Born Pretty Store) review for you today but for a completely different product. I saw a Youtube video a long long time ago featuring nail foils. I could not decide whether I liked the idea or not. On one hand, it is VERY RA-friendly. On the other hand, the final nail art looks kind of messy and unintentional. I know, I know, sounds strange coming from the girl who loves abstract nail art! I do not really know how to explain it, but something about foil nail art does not look right.

I was always curious so I thought this was the perfect time to try them! BPS has a huge selection, something like 27 colors, of these (nail art) foil papers so there is something for everyone…as long as you like metallics, of course!

I hope you find this review helpful!
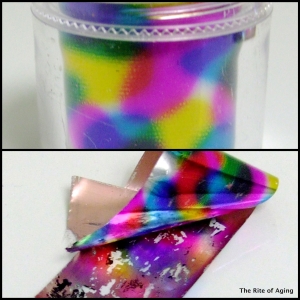
 

nail foils

Nail Foil #27

The above picture also links to the product’s webpage.

The foil comes in a plastic tub with a screw-off lid. The product measures about 44 inches, which I was really surprised about because I did not read the product description, as per usual. When I first saw the product I thought it was only the diameter of the jar so I was very happy when I realized how much there actually was!
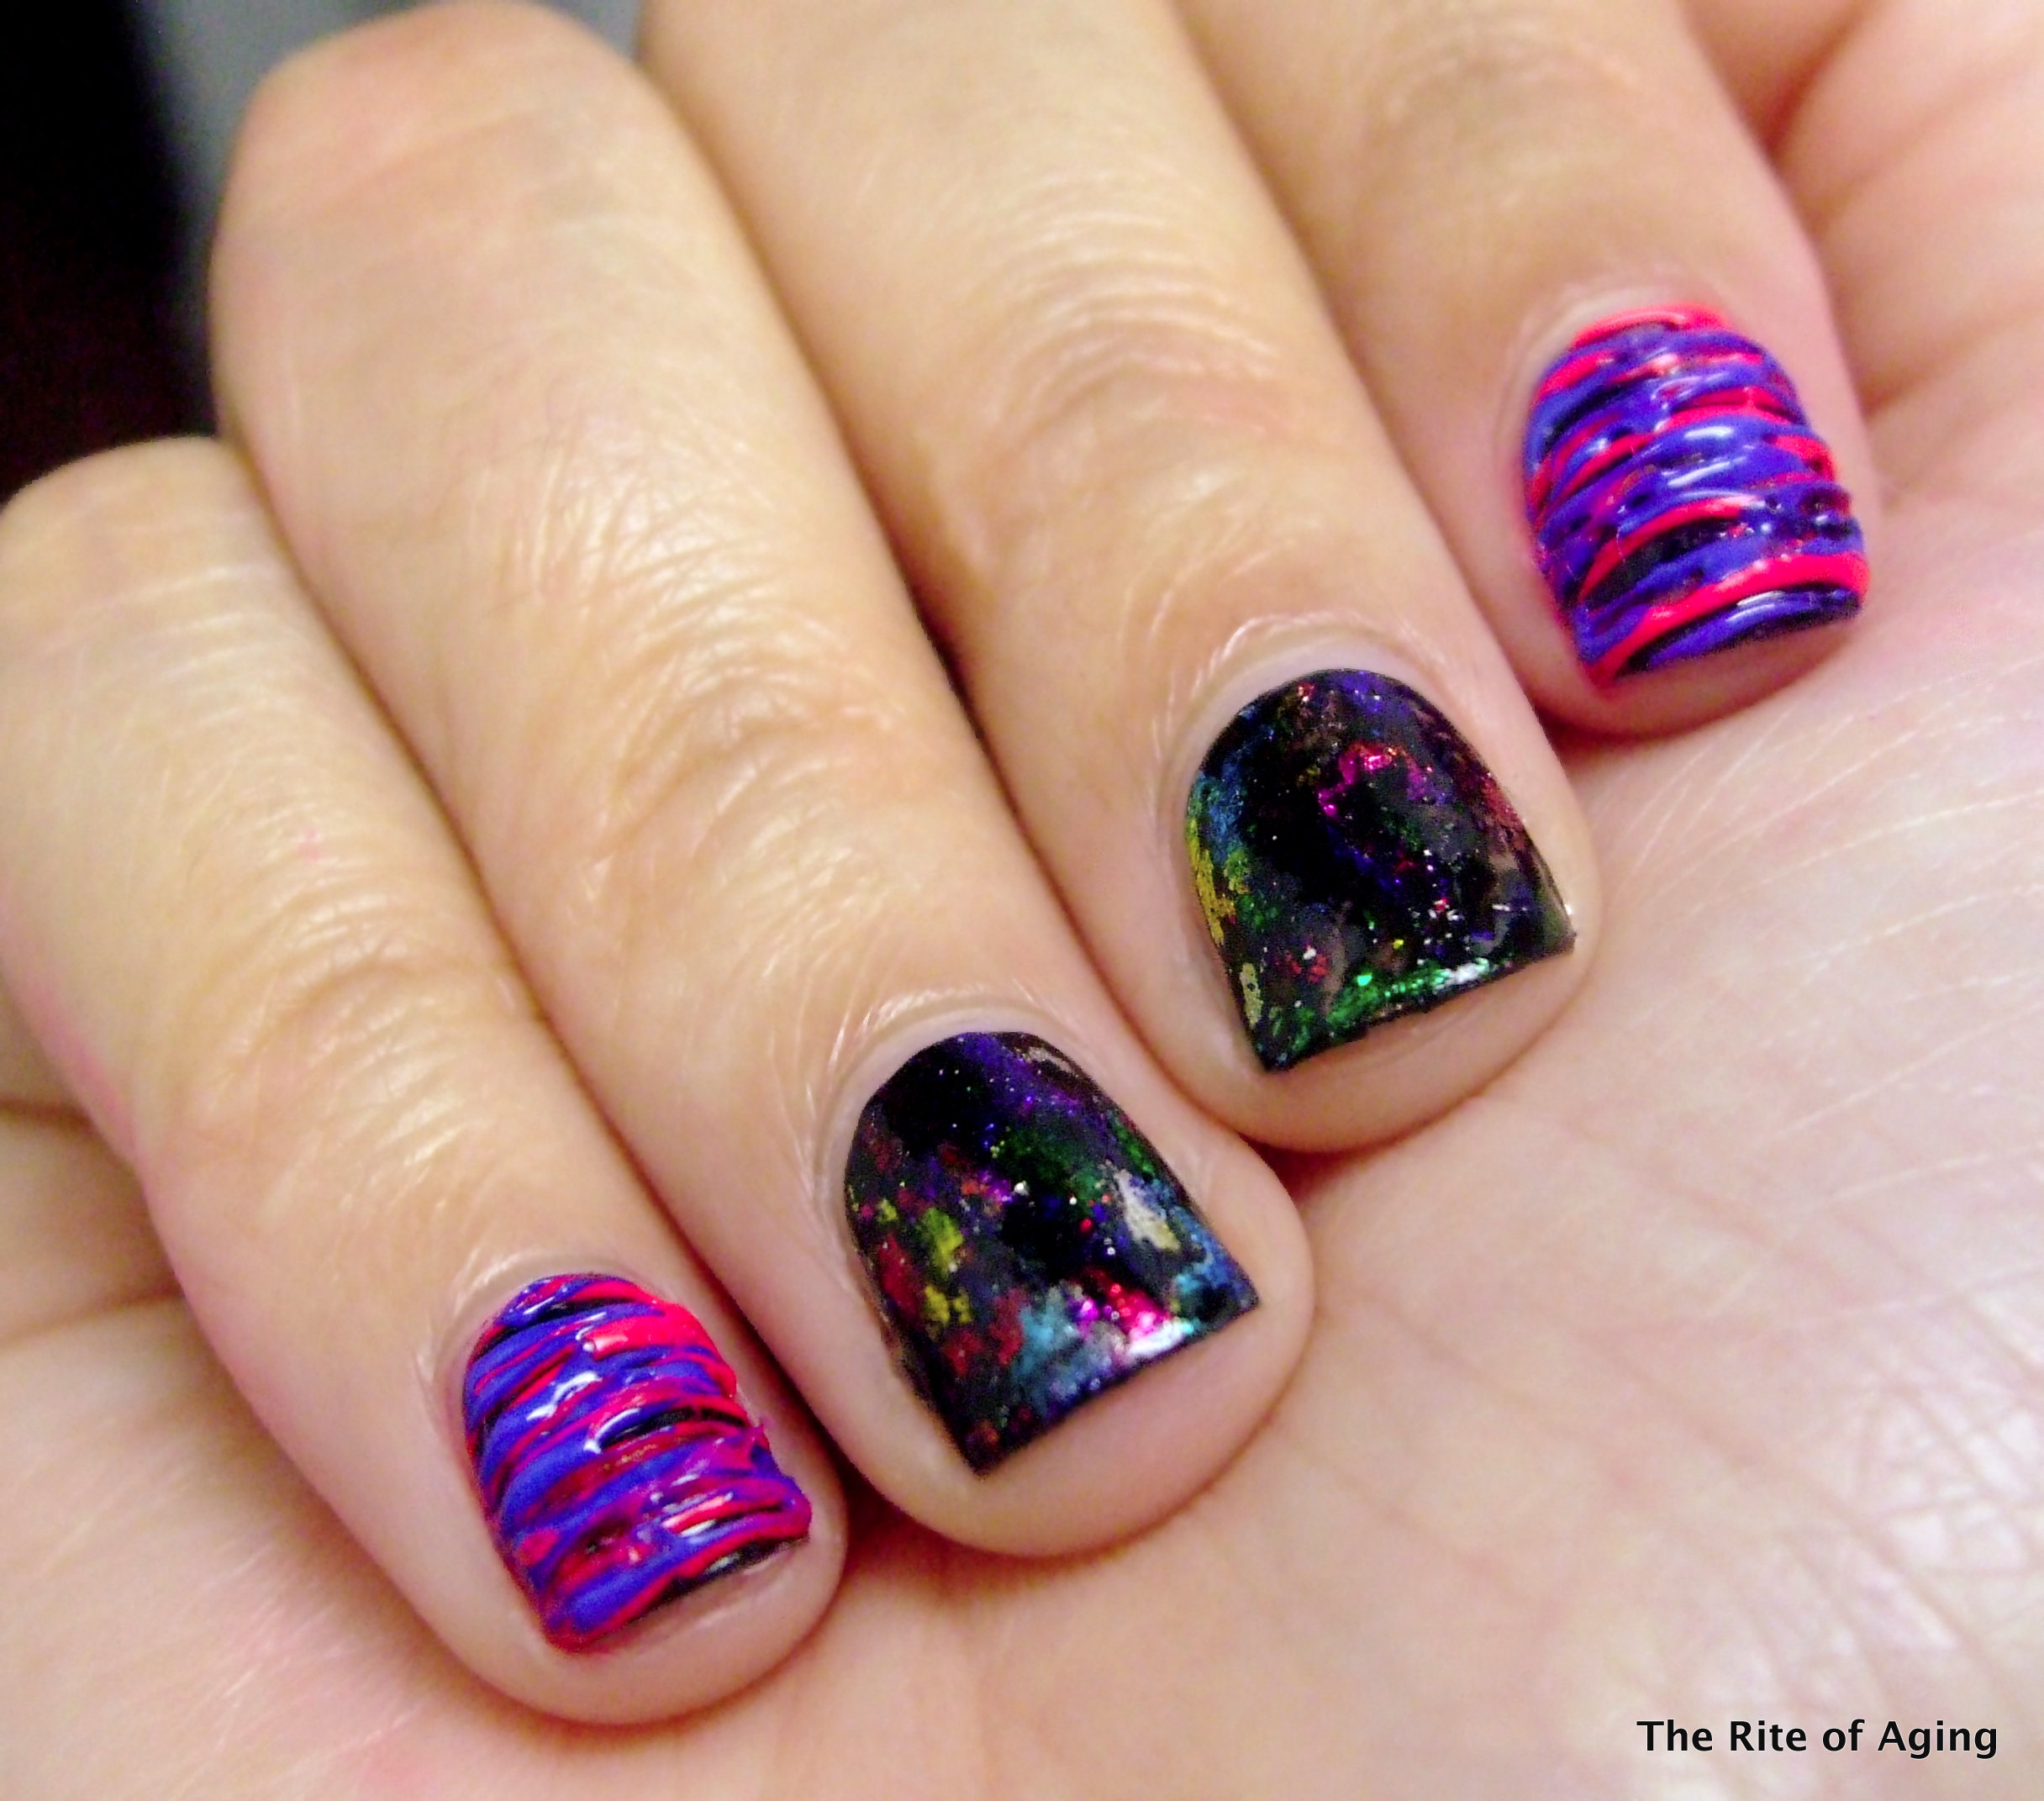
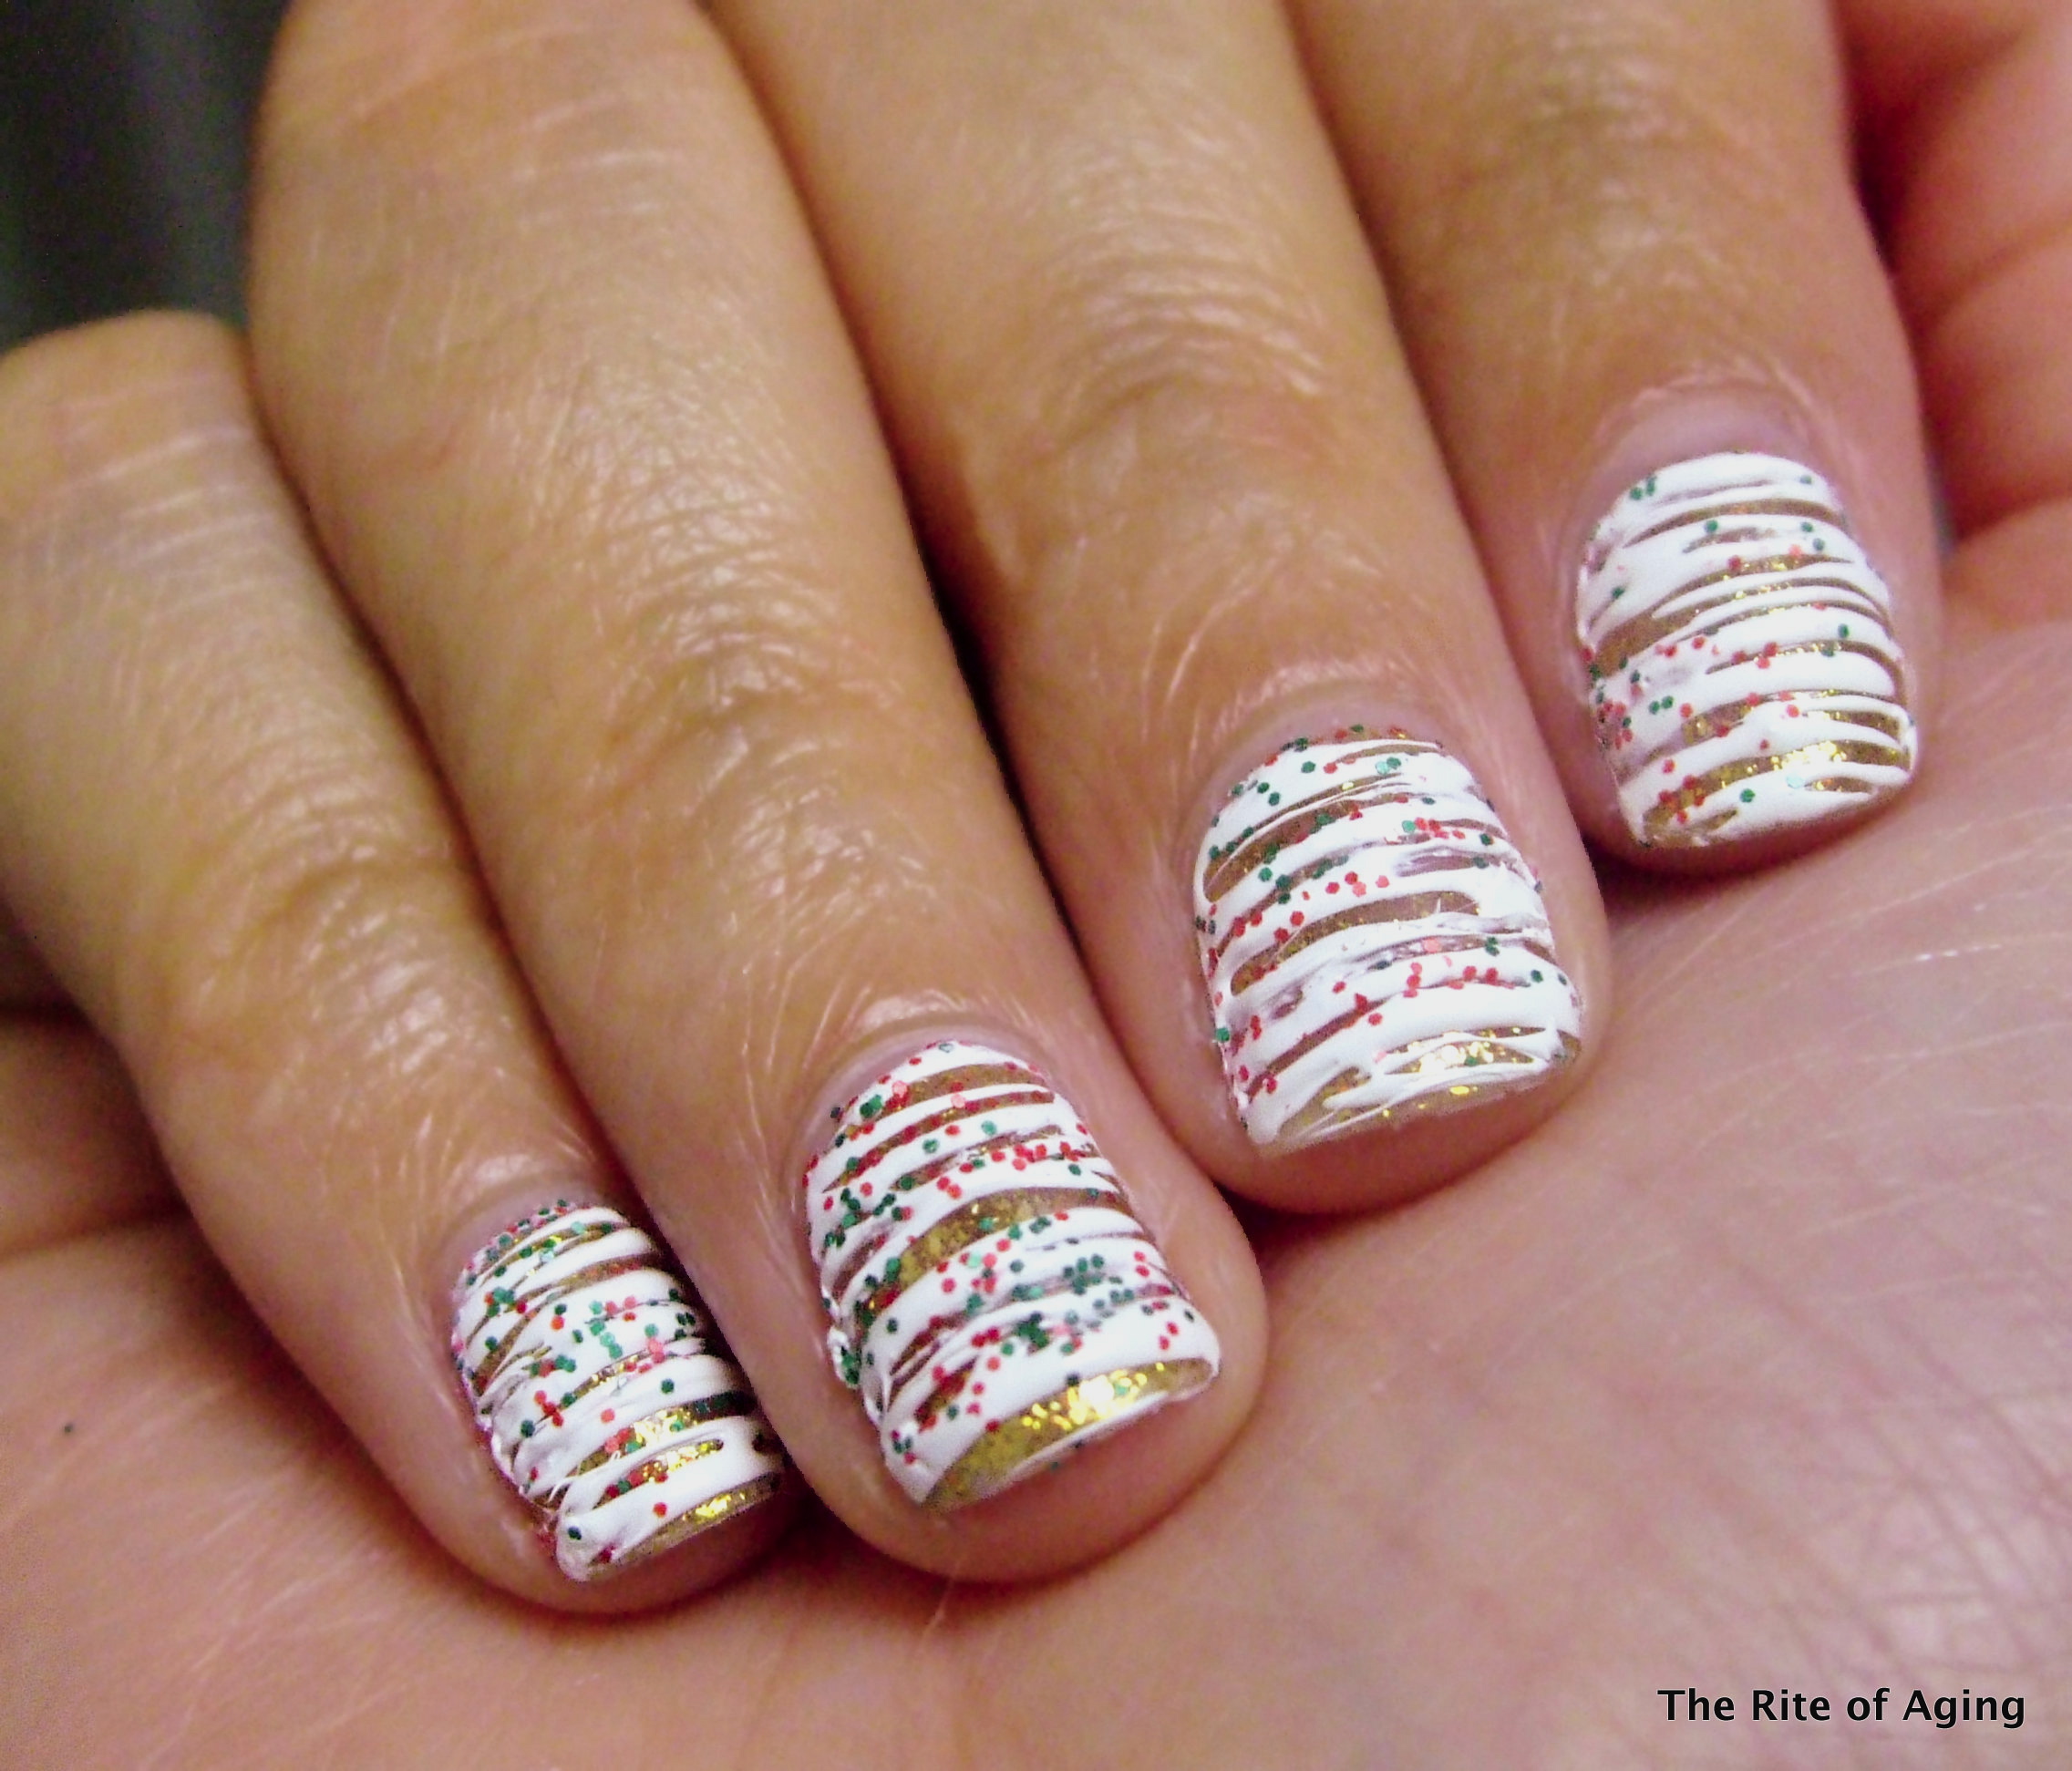
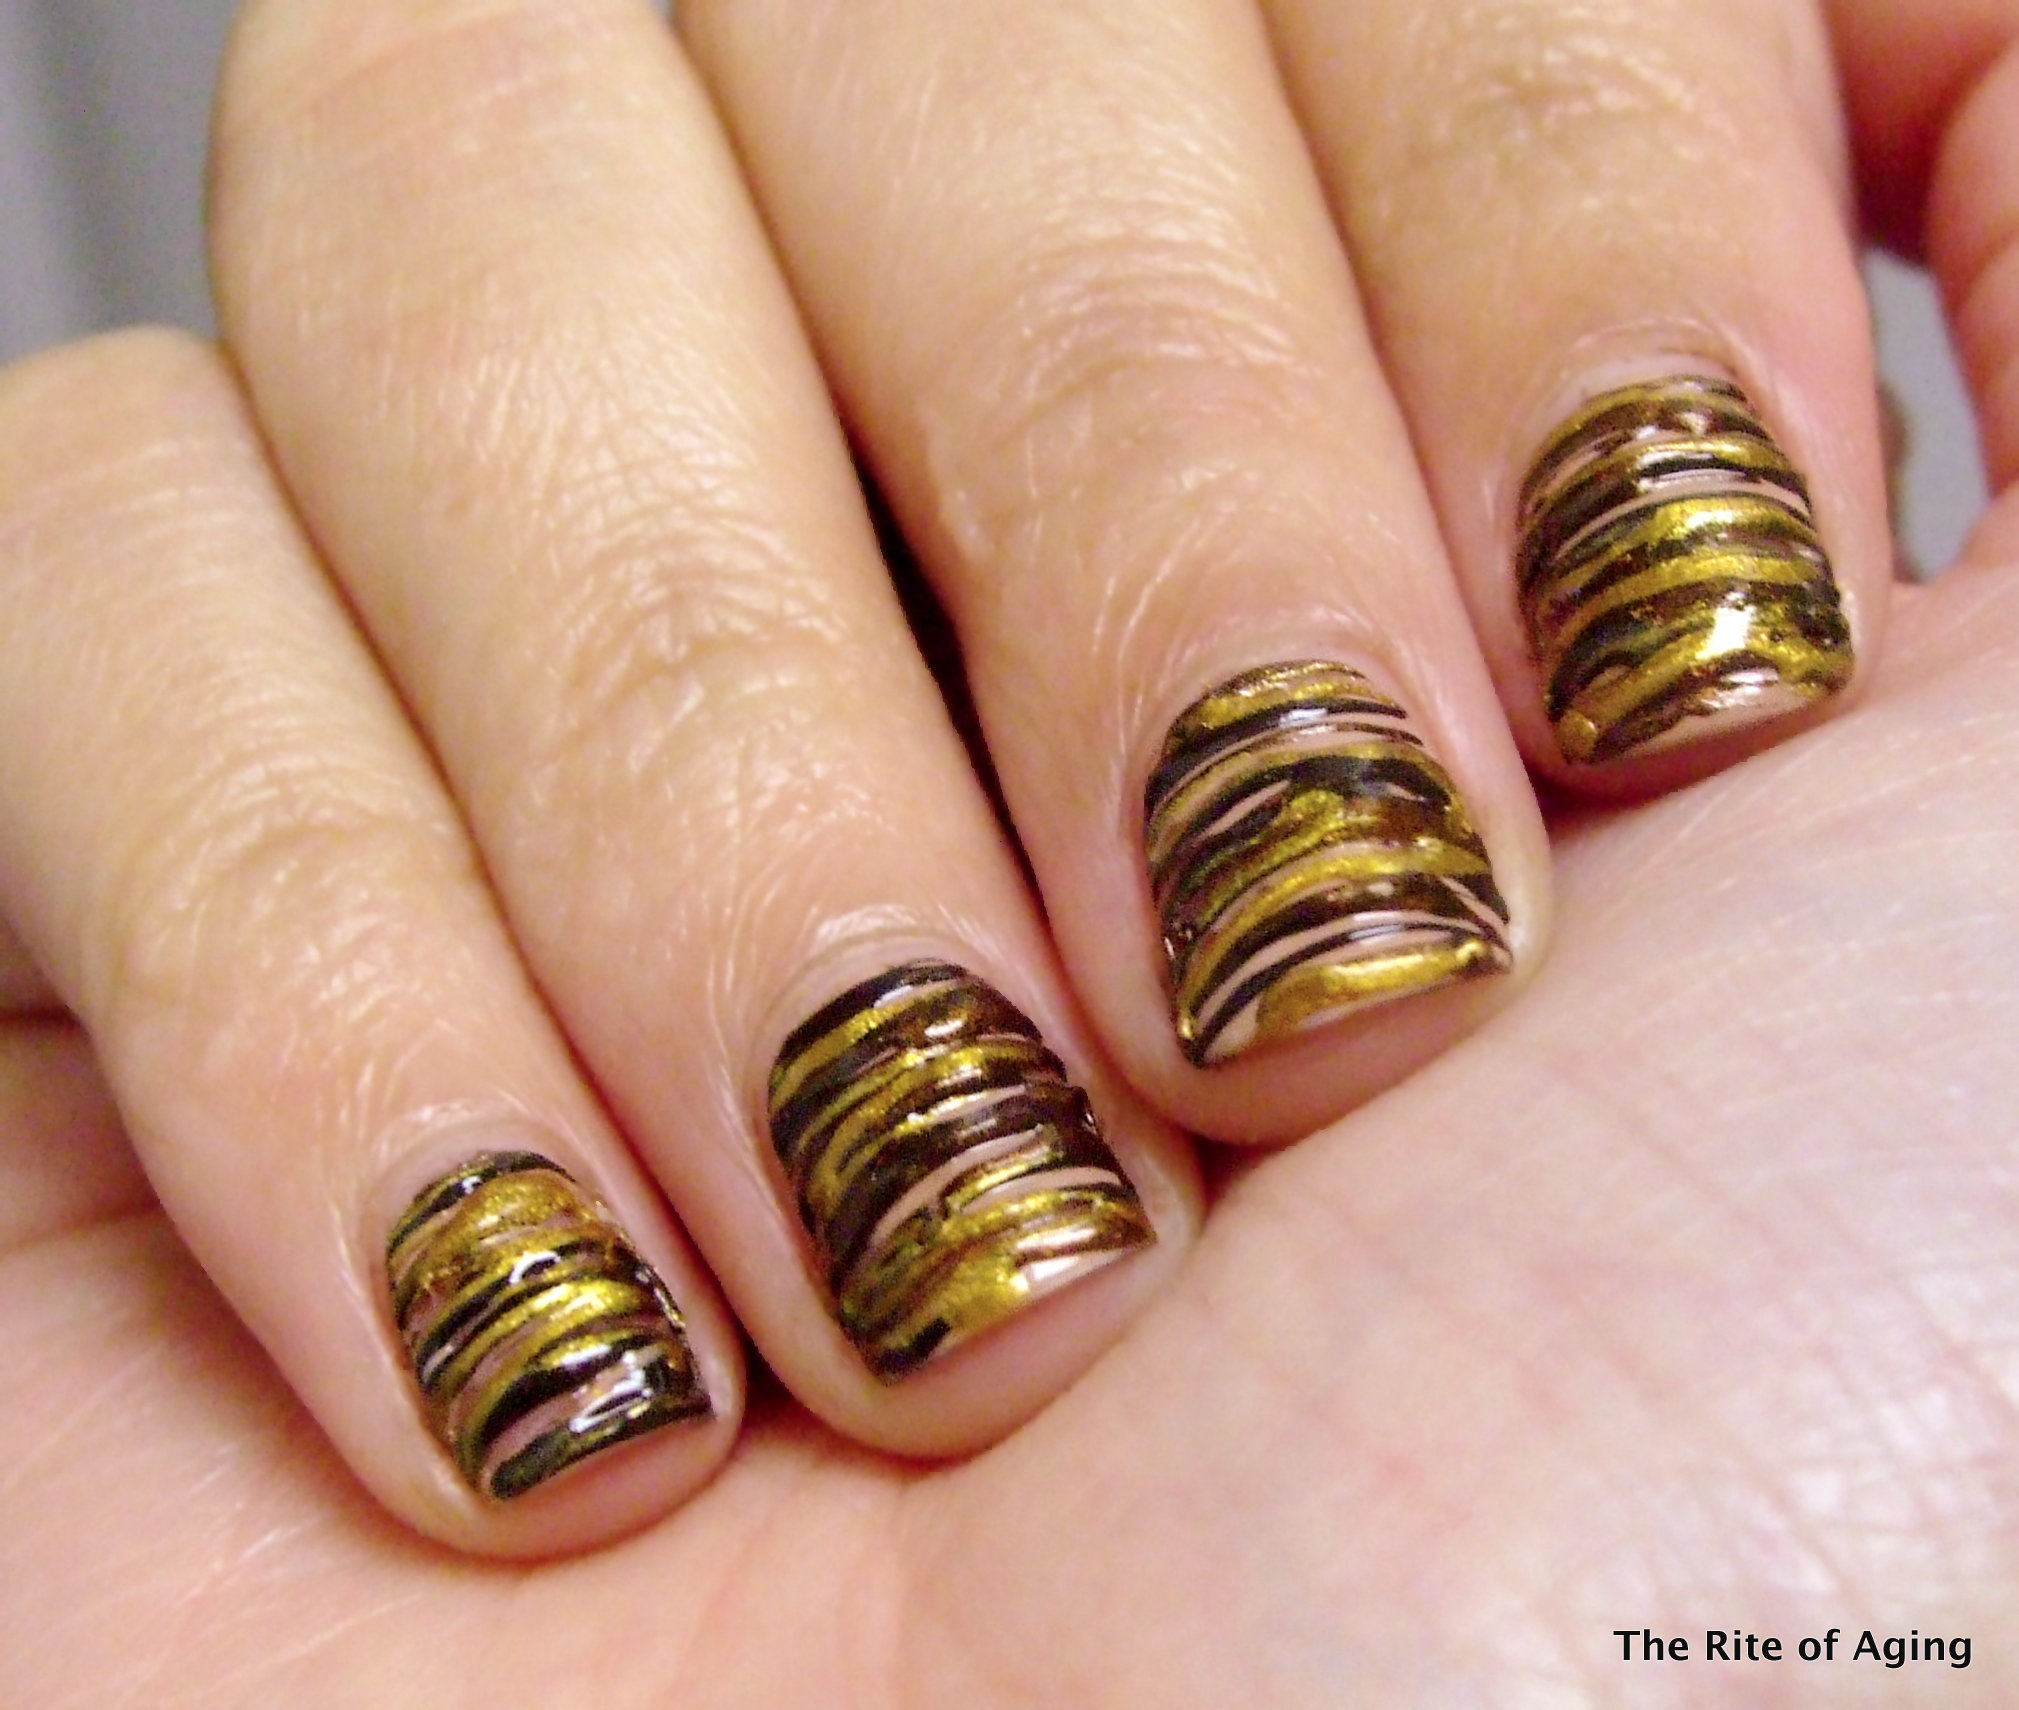
 

DSCF1906_fotor

For this look:


I used 2 coats of Wet n Wild Black Creme as my base.

I used Color Club Warhol and Pop Beauty Pacific Hoot for the sugar-spun.

Application and Thoughts:

Wait until the last coat of polish is slightly dry and tacky. Gently apply the foil over the nail with the color face up. Quickly lift the foil off the nail.

I watched a couple of videos where people were able to apply the foil to the entire nail and pull it off. However, when I used this method, I also removed the polish. I had more luck applying the foil to smaller areas instead.

The foil was very easy to use. I did experience a great deal of trial and error figuring out how tacky and dry the polish had to be and ended up with bald spots. I just re-applied the nail polish and foil. The polish had to be on the drier side of tacky so this technique worked well for me.

The used spots of the paper became clear so it was easy to not re-use spots.


nail foil close upWhile this was a very easy and quick nail art technique parts of it were tedious. It took multiple attempts to build up the color and it was difficult to foil the edges of the nail. Regardless, it was not time-consuming so I did not mind the extra work. I think with a little practice I will not have to “re-touch” as much.


I recommend the foils unless you are not a fan of abstract nail art since there is no way to get a structured look with these. As I worked with these I think I realized why I did not like them at first. I do not like the look of bigger chunks. I much rather like the look of the smaller particles that mimic a flakies top coat! I guess that is personal preference, though. What do you think? Have you tried these foils? Which look do you prefer?

One jar of foil (or ~44 inches) retails for $1.50 at the Born Pretty Store website.

If you decide to place an order do not forget to apply my discount code below!


unnamed

Hi, my name is Monica and I have RA.

Nail Art: Christmas Sprinkles

Tags

, , , , , , ,

I do not really have much to say today so I will just get into the nail art!

I hope you like it!


holiday sprinkles sugar spinI started with 3 coats of Sinful Colors All About You. I think I should have used 4 but I figured the sugar-spin would distract from the opacity issue.

I sugar-spun with Milani Spotlight White.

I sprinkled green and red glitters over top. I bought an assortment pack from Michael’s a while ago and I finally used them!


Hi, my name is Monica and I have RA.

A to Z Series: D is for Dark

Tags

, , , , ,

Check the sidebar for more information.

I had this AMAZING idea for this week’s AtoZ prompt until I realized my butter London The Black Knight nail polish was over a year old…If you are familiar with this polish you know it is the most incredible densely packed glitter bomb galaxy beauty EVER…now fast forward a year…see what I mean? It did not stop me from trying though…After I removed the biggest nail art fail ever I decided to take a step back and go for some classic white on black.

I would tell you what my first design was but I am re-purchasing the polish and re-trying the design at a later date.


I hope you like it! Sometimes you just cannot go wrong with class colors and shapes! Please do not mind the middle nail…I am not sure what happened there and did not even notice it until I uploaded the photo!


DSCF1814_fotor

I started with 2 coats of Wet n Wild Black Creme as my base.

I stamped with Pueen plate PUEEN44 and Konad Special Polish White.


Hi, my name is Monica and I have RA.


Don’t forget to check out the other dark manicures below!

Nail Art: Colder Days

Tags

, , , , , , , , , ,

The temperature dropped 30 degrees within an hour this afternoon. Okay, maybe not 30 degrees but it certainly felt like it. By the time I returned home from work I moved like the tin man and needed oil for all my joints. I hope this is not an omen for winter months to come!

In honor of the frozen ground this morning I decided to pull out my trusted snowflake stamp! I love how this manicure came out…I love how the sparkle is mostly concentrated at the cuticle since the Zoya polish was spiked with holographic glitter!

I hope you like it!


colder daysI started with 2 coats of Milani Power Periwinkle as my base.

I used a makeup sponge, Milani Power PeriwinkleSally Hansen Blue My Mind (okay, this is going to sound odd but to anyone who owns this polish…is it just me or does it smell like pot?!) and Zoya Dream for the gradient.

I stamped with Bundle Monster plate BM 319Konad Special Polish White, and Essie No Place Like Chrome. I sealed the design with Seche Vite before applying a generous coat of INM Northern Lights in Silver.


Hi, my name is Monica and I have RA.

Nail Art: Fall Sugar-Spun

Tags

, , , , , , ,

It just would not be a complete season without a sugar-spun manicure on this blog, right? Tonight I sat down to do a water marble but I could not get the polishes to spread in the water properly so I resorted to sugar-spinning. Okay, sugar-spinning is never a next resort on this blog but it was not initially what I wanted to do.

I hope you like it!


fall sugar spunI started with three coats of butter London Tea with the Queen as my base. I really should get rid of this polish. Even underneath the sugar spun I absolutely hate how looks. I really do not know why keep using it.

I sugar spun with Milani Dark CoffeeSpaRitual Running with Wolves and Zoya Goldie.


Hi, my name is Monica and I have RA.

A to Z Series: C is for Copycat/NAIL: Geometrics

Tags

, , , , , , , ,

Check the sidebar for more information on both challenges.

I recently joined another nail art community on Facebook and love the idea. It is called the A to Z weekly blog. Every week, Charlie from Pocket Money Polishes provides a prompt corresponding with a letter. The interpretation is very open so I can take it any direction I want.

However, since I am still figuring out my blogging schedule I decided to combine challenges. This nail art also serves for this week’s NAIL prompt. Symmetry is a huge part of geometry! I am not much into shapes so I am glad I could stretch the prompt without using them!

I hope you like it!

c is for copycatI started with 3 coats of Pahlish as my base.

I stamped the paw print with Konad Special Polish Black and Mundo de Unas plate LO06.

I used an assortment of decals from the Pueen water decals collection WD2 I bought from Amazon.com.

Hi, my name is Monica and I have RA.

Check out the other copycat nails below!

Born Pretty Store Review: Nail Accessory Lovely Tiger Pattern Water Decals

Product provided for review. All opinions are my own.

I have some exciting news! (Born Pretty Store) contacted me about reviewing a couple of products for them! Born Pretty Store is a large online (nail art) & beauty supplier that ships worldwide! They graciously sent me three products I will review separately over the next couple of weeks.

As you know, I am not really into freehand detail work so one of my favorite cheats for cute, fast and easy nail art is water decals! BPS has an absurdly large assortment of them and I love looking through them.

In this post I will review a set of tiger decals I fell in love with while choosing products. I hope you find it helpful!

lovely tiger water decals from bps

Product: BLE586

I forgot to take a picture of the decals before I dug into them so I took this picture (it links to the item’s web page) from the website. Aren’t they cute? I have a soft spot for tigers. I may have mentioned this before but after I finish vet school and my residency I would love to work with a conservation agency specializing in the White Bengal Tiger!

Anyways…on to the nail art I created!

DSCF1717_fotorI started with 2 coats of Color Club Twiggie and 1 coat Serum No. 5 Forest Lights as my base.

I distressed with Zoya Giovanna and Color Club Twiggie before sealing everything with Seche Vite.

I applied the water decals on the middle and ring fingers. I waited 10 minutes before gently sealing them with Seche Vite.

Applications & thoughts:

I cut out the individual decals before removing the protective plastic cover.

I soaked the decals, one at a time, in a cup of water for 15-20 seconds. If that was not long enough, I just stuck them back into the water until the decal slid easily of the backing paper.

The first time I applied the decals they slipped all over the place and refused to stay put. I dunked my fingers into the cup of water and the extra moisture seemed to help them stick better. The decal did not sit completely flat on my nail but top coat fixed that issue. I did not experience any bubbling either.

I waited about 10 minutes before applying top coat as I have had trouble with smearing the image in the past. I even used a blow-dryer on one of them to see if it made a difference. (It doesn’t!)

DSCF1717_fotorI have to say I am so pleased these decals did not smear! I bought a few water decals last year and they smeared every time I applied top coat which was a huge bummer.

I tried to use the year-old decals recently. Not only did they not adhere to the nail, even with the above method, the images  smeared so badly I ended up with bald spots. Not a cute look! I heard the decals dry up over time and do not work properly which is slightly annoying since nail art supplies should not “expire”. I hope this does not happen with these tigers! Though, I may end up using them before they get a chance to.

Now on to the nitty-gritty about shipping, etc. –>

BPS ships out items quickly after placing an order. However, BPS does not track packages so the shipment can get lost. It should only take 3 to 5 weeks for the package to reach it’s destination (this latest order took 5 weeks). Unfortunately my first order ever placed took 2 months to reach me! I had honestly forgotten about it until one day it just appeared in my mailbox. Okay, sometimes it happens. I placed a second order. I never recieved it. I emailed customer service and they promptly replied and re-shipped the order. I still have not received it. I wish there was a way to track orders to make sure the package ends up in the right place!

However, I am okay with the trade-off. The items on the website are super cheap. These decals only cost $0.99/sheet and with free shipping, the price is right.

Take a look at the website. They not only have a large selection of nail art goodies but a very diverse selection within each category. If you place an order don’t forget to apply my 10% off coupon code below!

unnamed

Hi, my name is Monica and I have RA.

Design a site like this with WordPress.com
Get started